The Nibbler will cut sheet metal, corrugated and rounded tubular sections etc, in straight lines and curves with radius as small as 8mm (5/16”)
The cutting head (Die) can be rotated into four positions to face forwards, backwards left or right, quickly and without being dismantled.
The tool will cut quickly without creating sparks or distortions, and will alleviate jagged edges.
Power Source: Any power drill, electric or air, with 9mm chuck & speed range 1,500-3,000 RPM
Cut Width: 4mm
Max. Cut Gauges:
We recommend that a separate punch and die be kept aside specifically for Stainless Steel.
Before fitting the drill ensure the drill is switched off and unplugged from the power supply
Insert the Nibbler Drive Shaft into the drill chuck and check to ensure the chuck jaws do not rub on the Nibbler
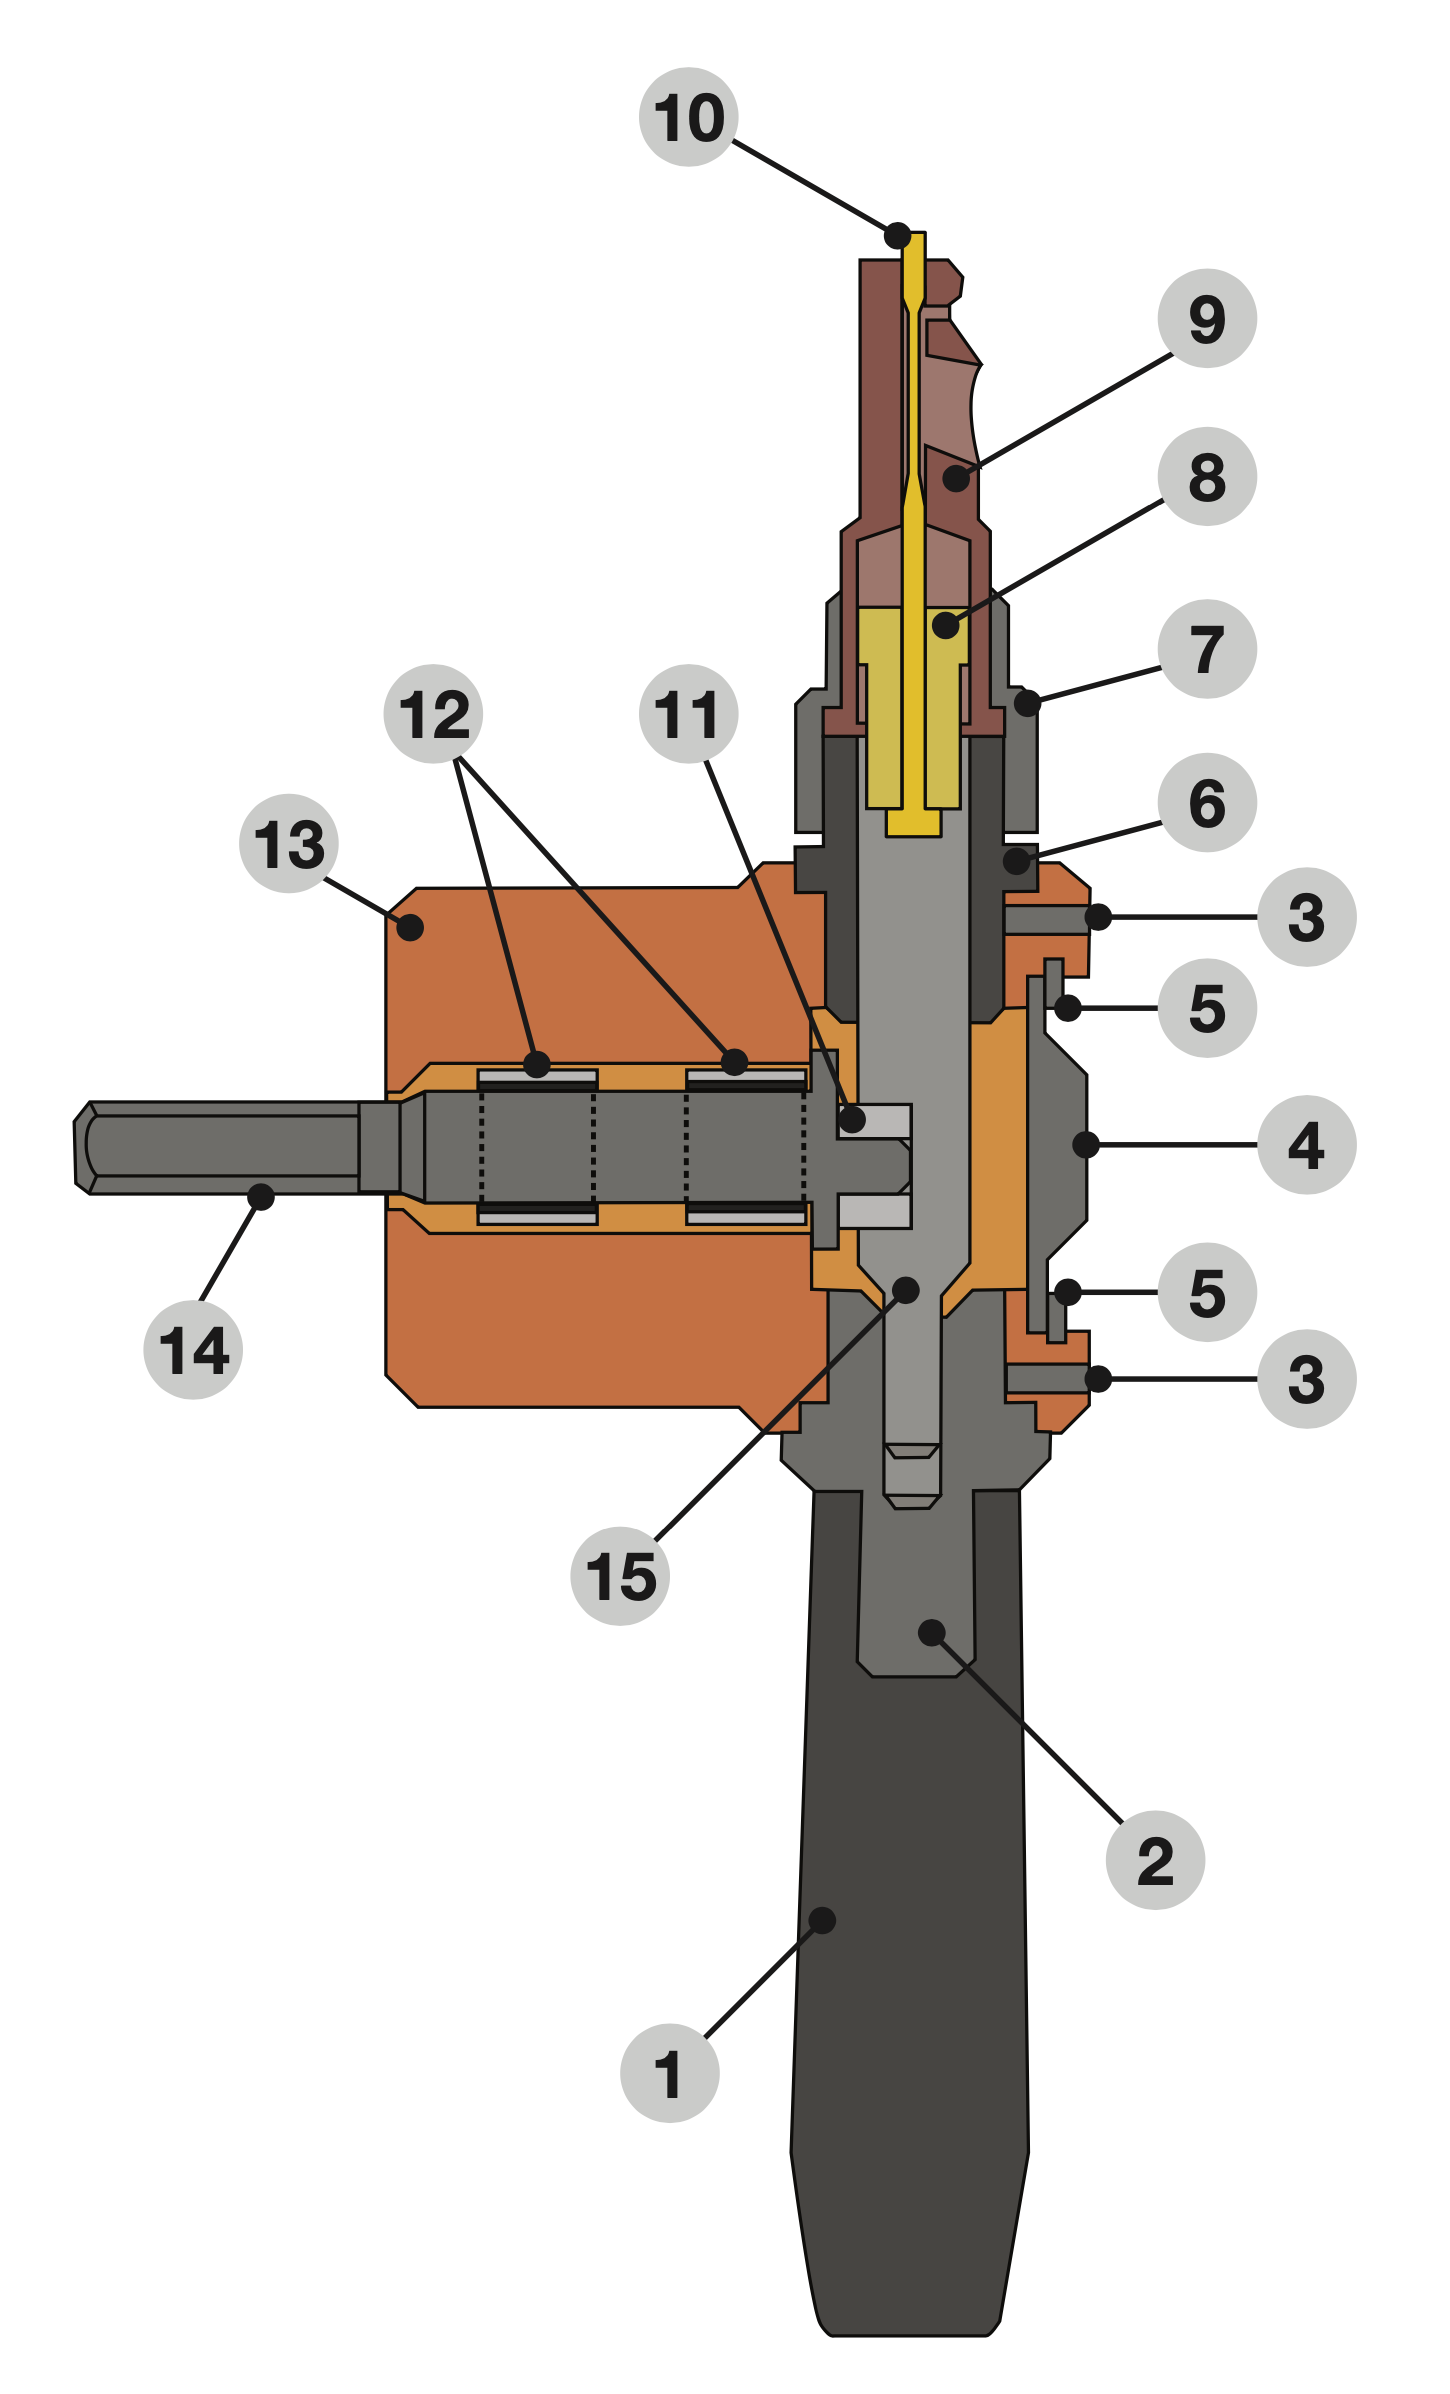
Select the desired position of the die of the Nibbler (KJT/9) by slackening the nose cap (KJT/7).
Ensure your work piece does not exceed the specifications listed in section 1.2.
Apply a smear of oil or lubricant such as WD40 to the tool cutting edge and along the work piece cutting line.
Connect the drill to the power supply and switch on.
Bring the cutter to the work piece whilst in motio.
DO NOT stop Nibbler whilst head is against work piece.
Hold the drill & handle of the Nibbler firmly as you proceed but do not force the Nibbler along.
When you wish to stop cutting, leave drill running whilst the Nibbler is removed.
DO NOT stop Nibbler whilst head is against work piece.
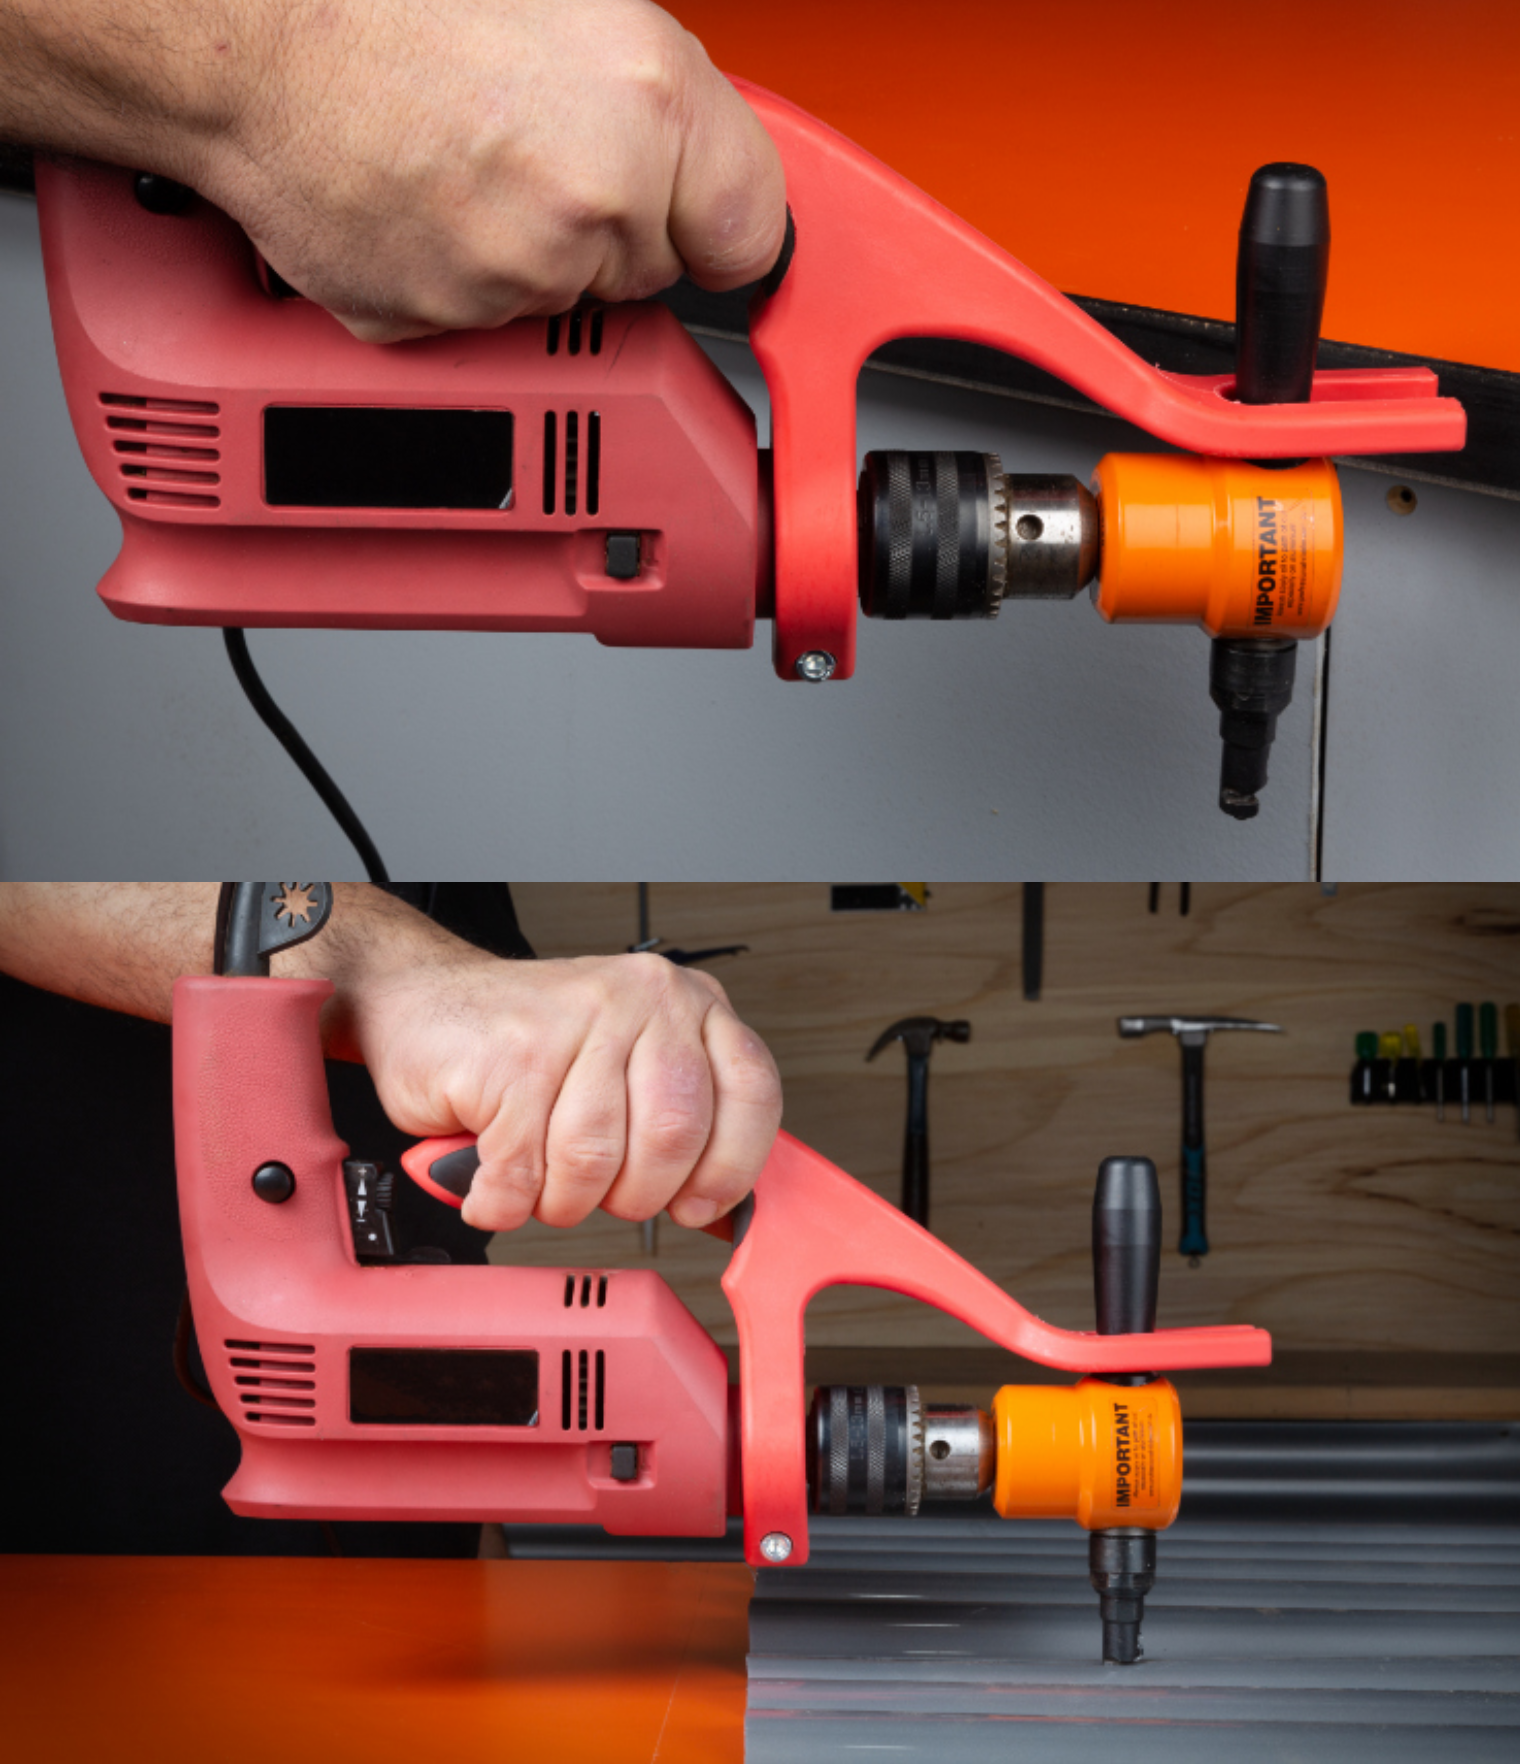
The Professional Nibbler can be used to cut one-handed, only with the specially designed One-Handed Operation Handle (sold separately). Do not attempt to cut one- handed without this attachment.
The One-Handed Operation Handle fits drills with a standard 43mm Collar. To fit the handle to your Nibbler, slide handle over drill chuck, onto the drill collar and tightened the bolt on the handle. Slide nibbler handle into groove in One-Handed Operation Handle, and tighten drill chuck.
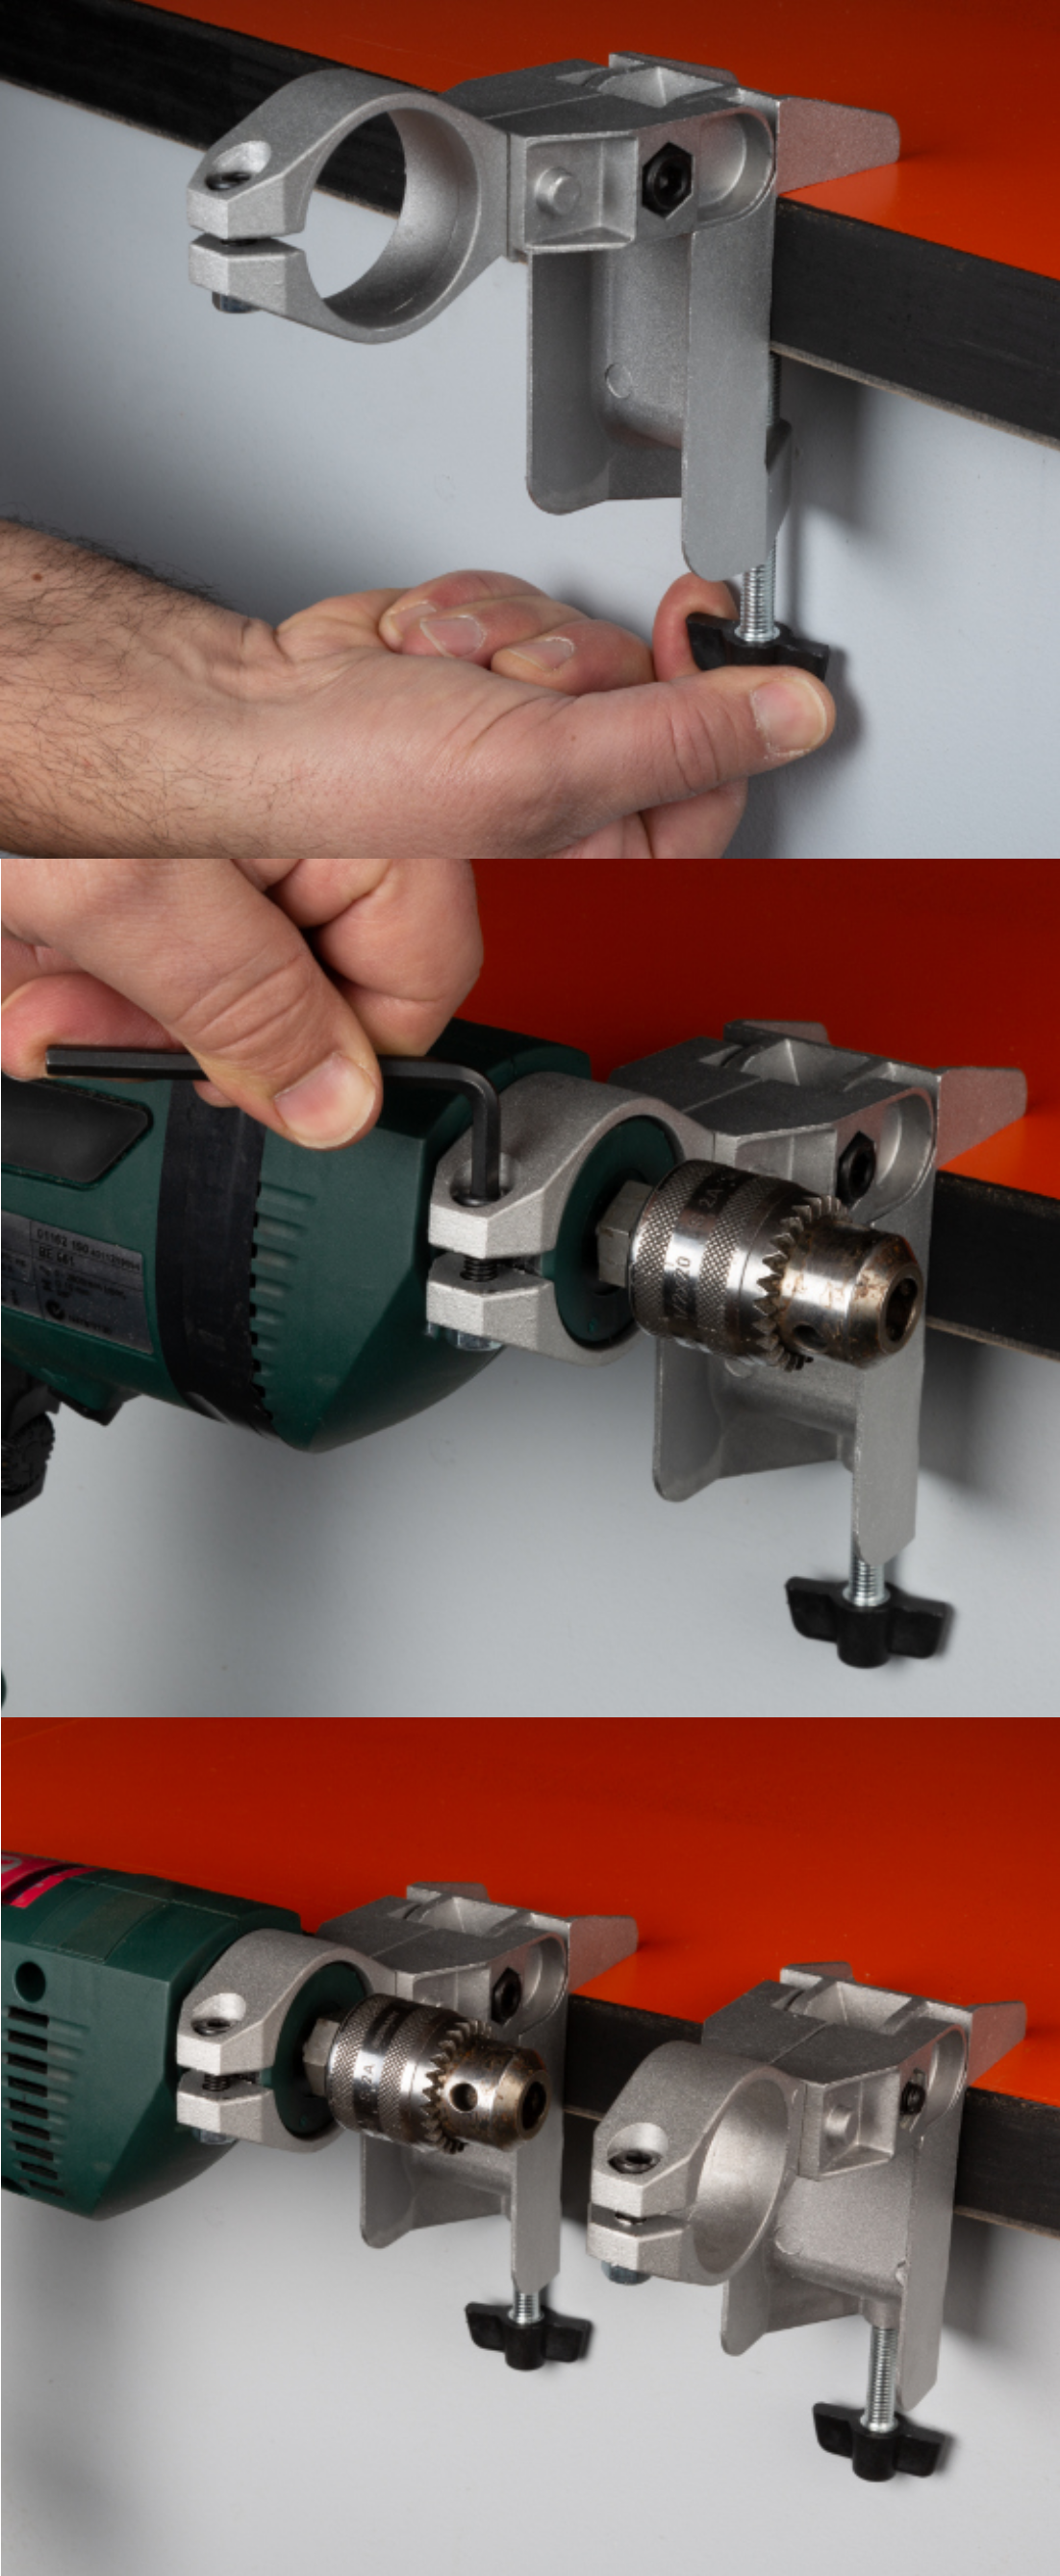
Attach first bench clamp to the edge of the work bench and loosely tighten the T-bolt.
You will lock the clamp into position later.
Slide the drill into the bench clamp and tighten with allen key for a firm hold on the drill.
Do not over-tighten.
Mount second bench clamp onto the work bench and loosely tighten the T-bolt.
You are ready to insert the Professional Nibbler.
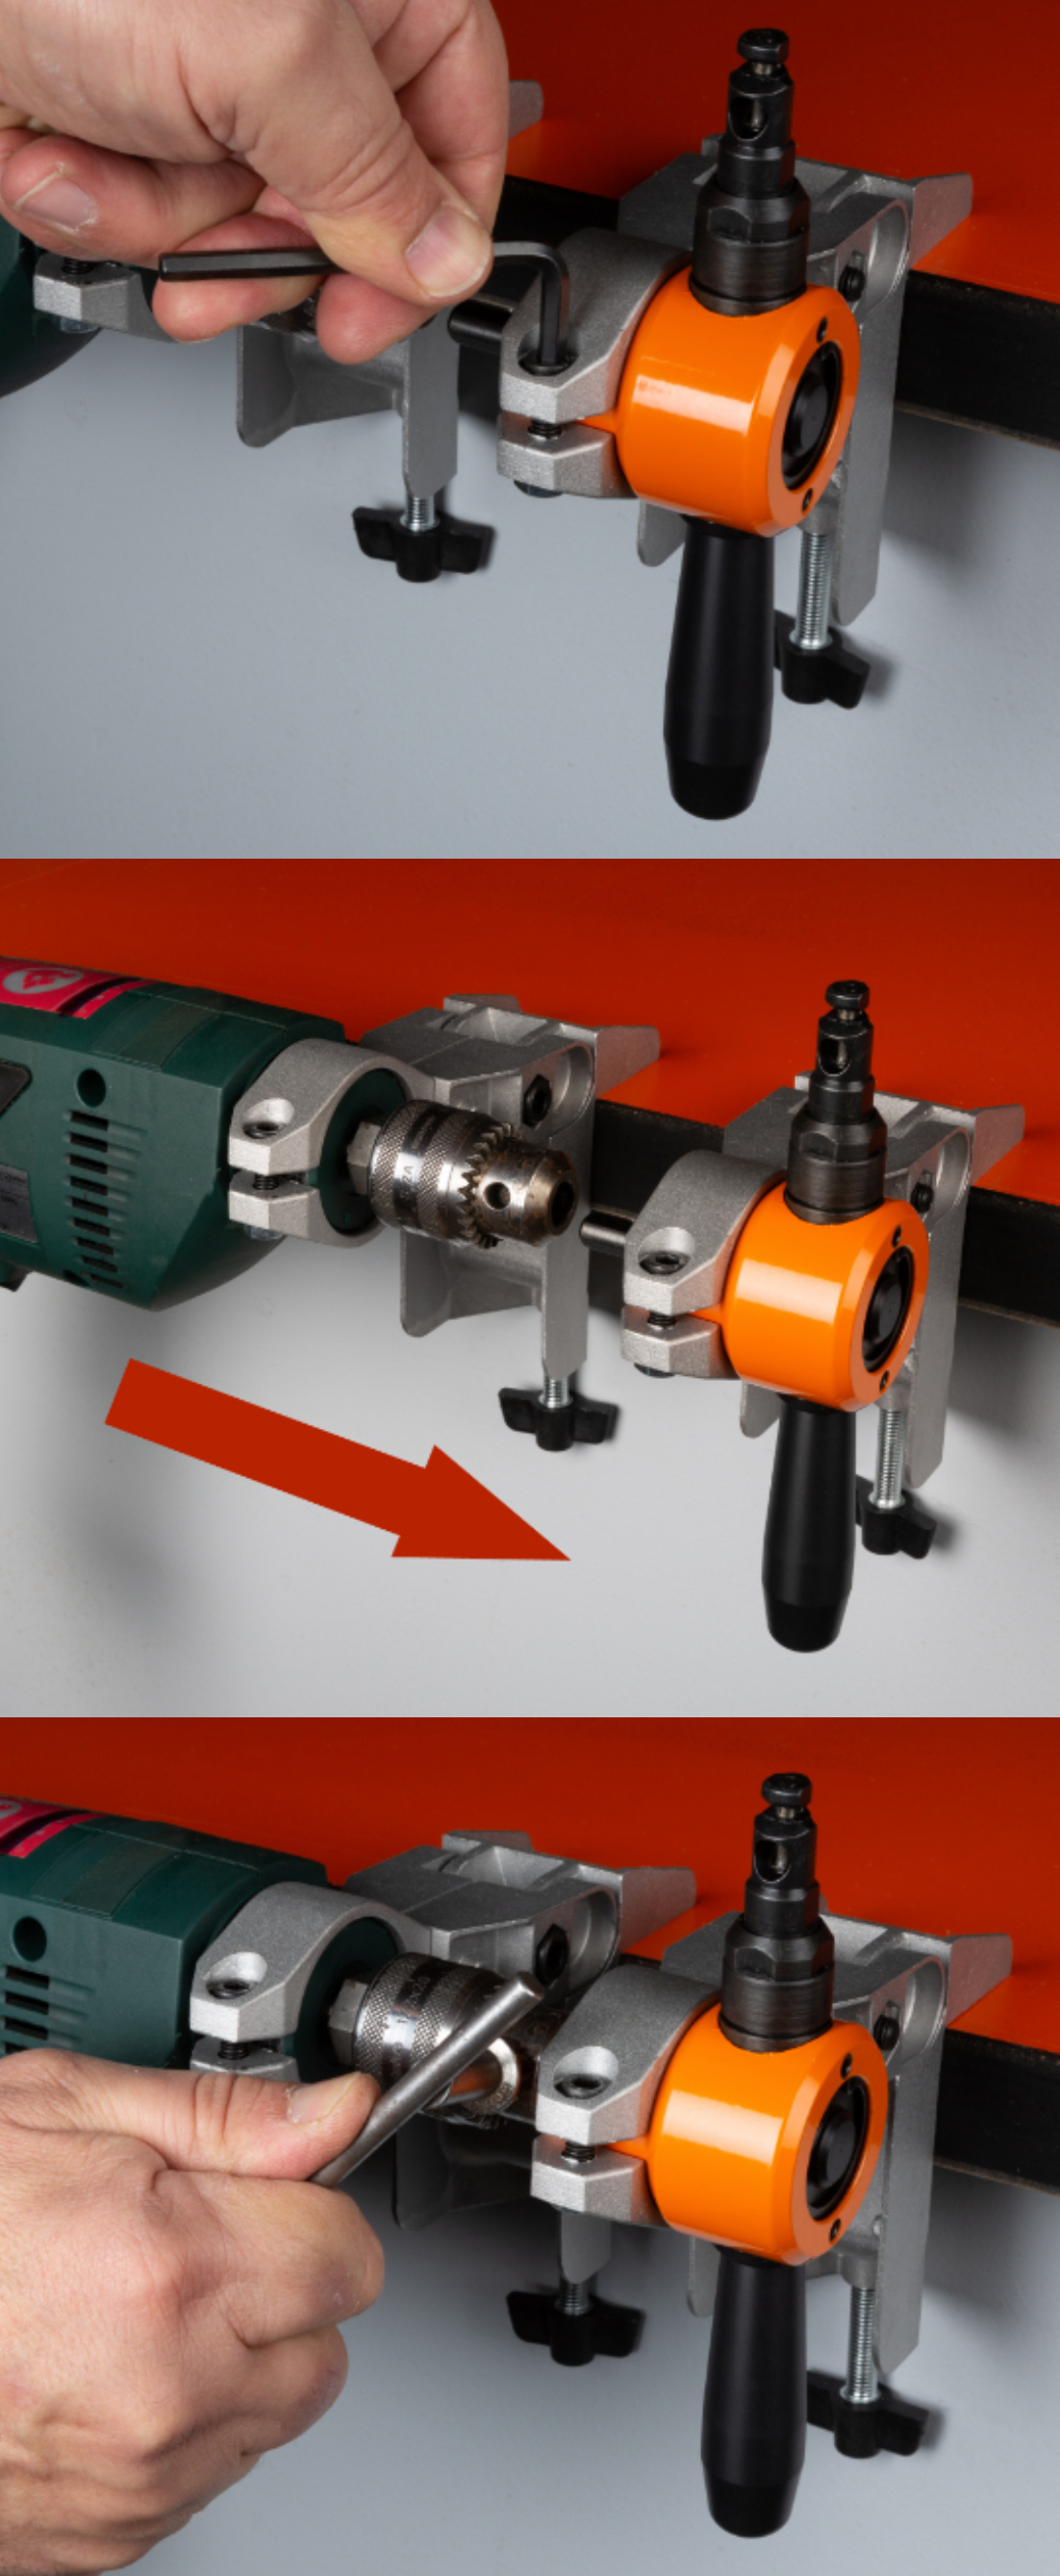
Insert the Professional Nibbler into bench clamp and tighten with allen key provided for a firm hold.
Do not over-tighten.
Slide the clamps along the bench until the Professional Nibbler’s drive shaft is inserted into the drill’s chuck.
Tighten drill chuck to secure the Professional Nibbler and drill together.
Leave 2-3mm gap between chuck jaws and Professional Nibbler body so they don’t rub.
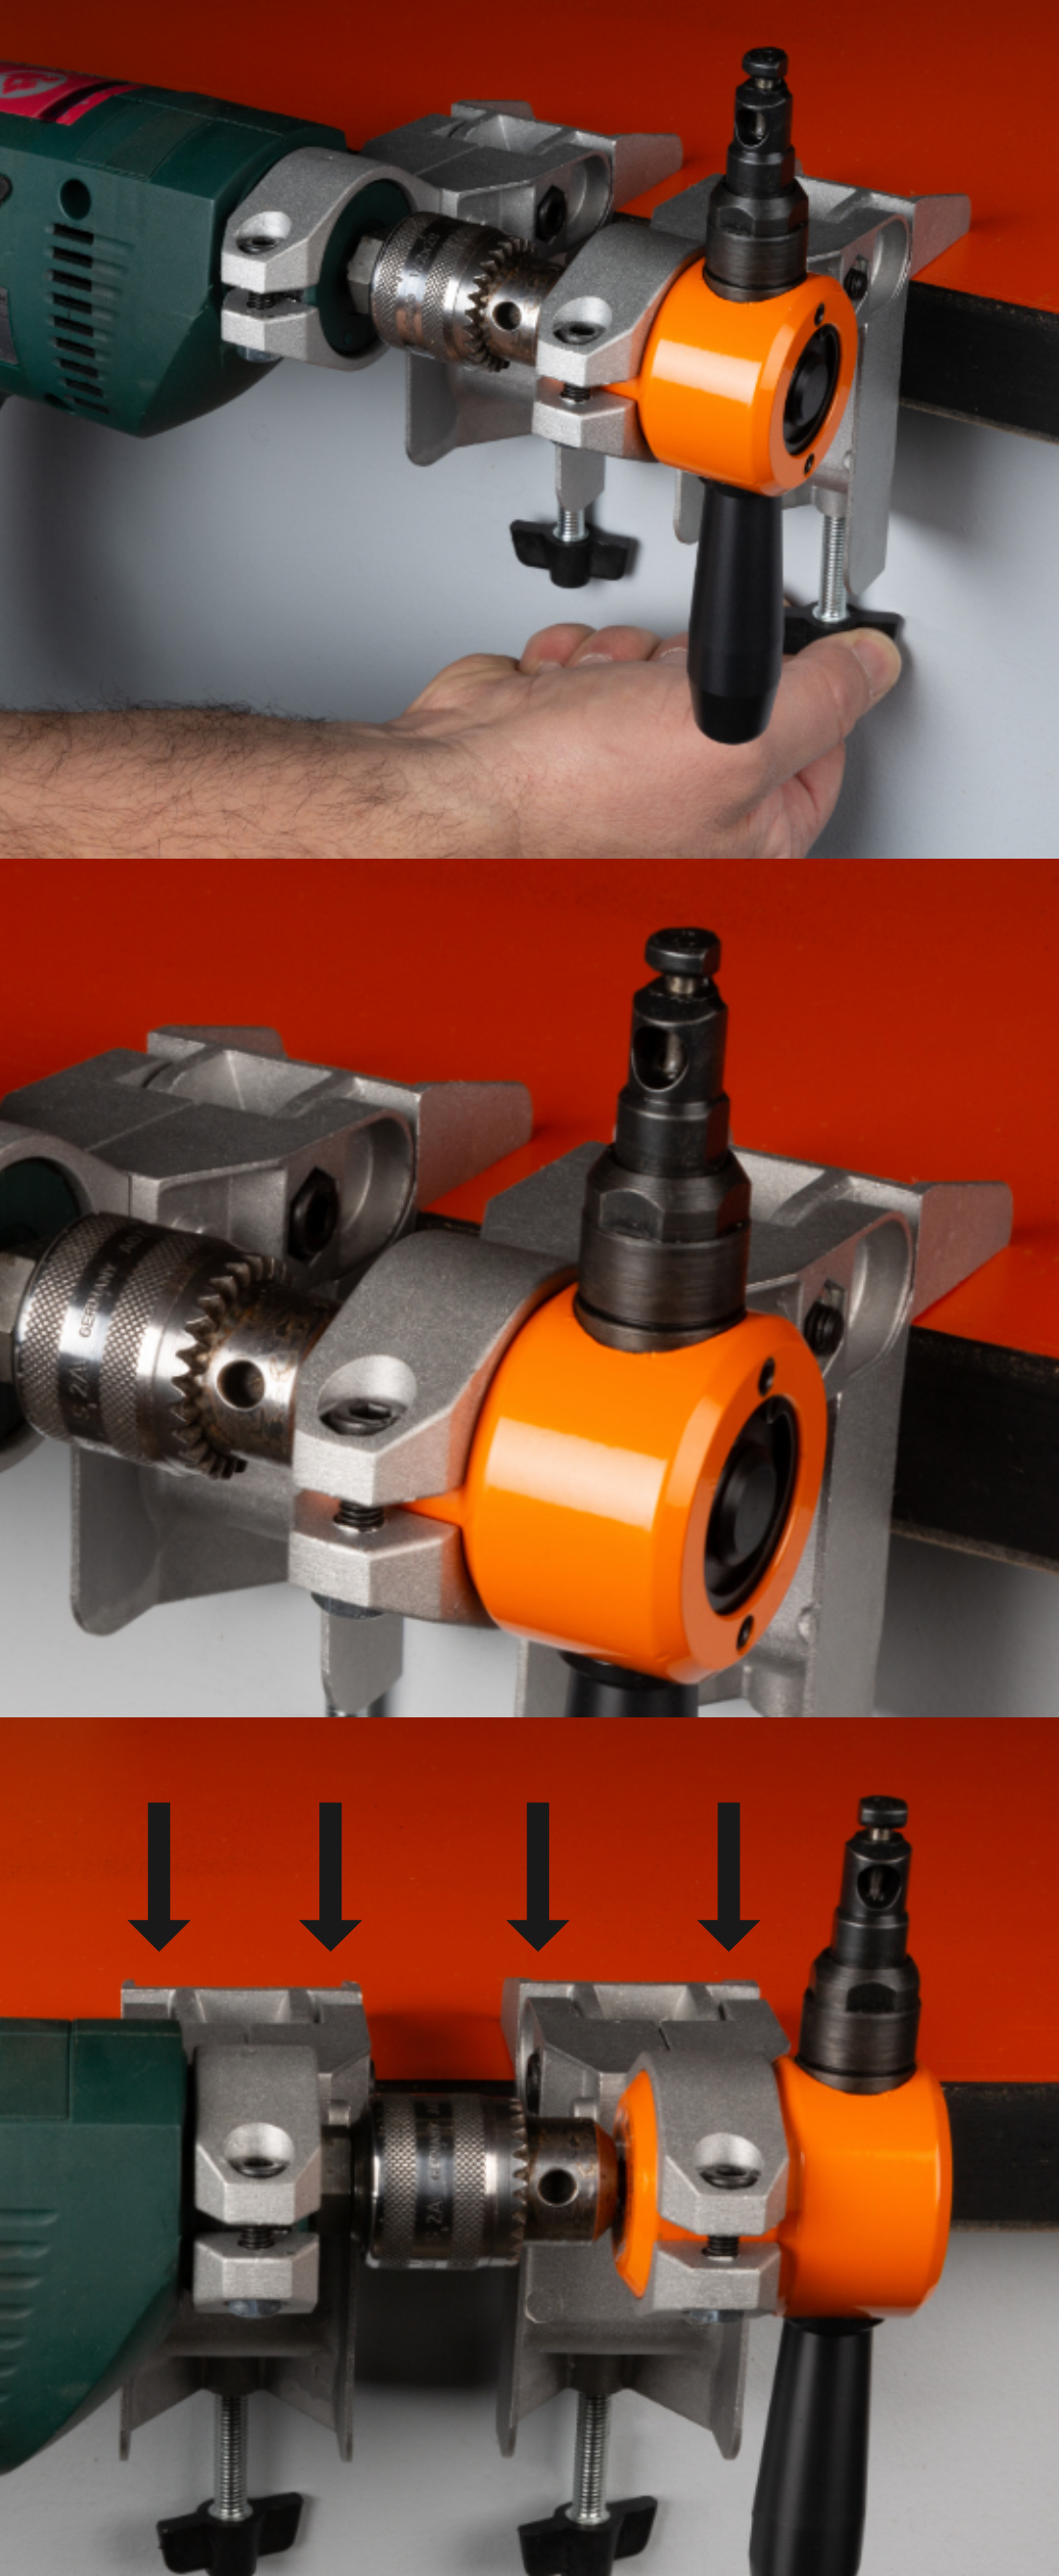
Now tighten T-bolts on each bench clamp for a secure hold onto work bench.
Ensure the Die is facing away from the bench and the Punch (cutter) is visible.
You are ready to begin your job.
Drive screws into the holes on top of the clamps to secure the bench clamps further to the work bench.
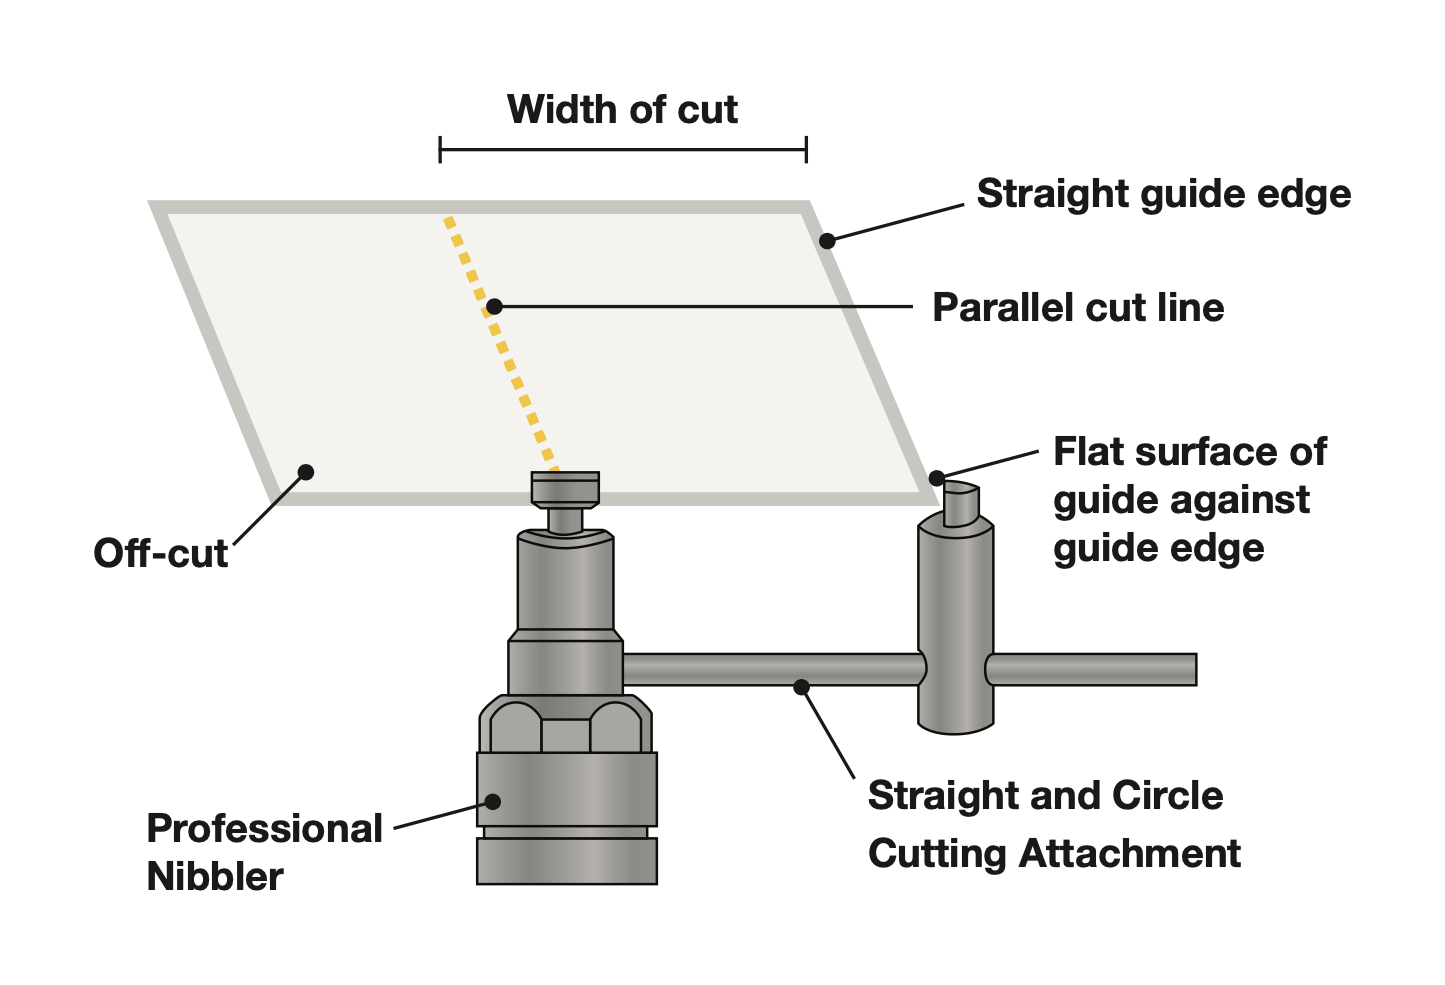
Cutting a straight line following an existing straight edge profile with The Professional Nibbler and the Straight and Circle Cutting Attachment (sold separately):
Set the required distance on the Guide of the Straight and Circle Cutting Attachment from its flat surface to the inside of the punch edge – See diagram below.
Holding the flat edge of the guide against the straight edge of the material, start cutting with the tool whilst pressing the edge of the material firmly against the guide. This will duplicate the profile of the edge of the material at the line of the cut.
Cutting a circle with The Professional Nibbler and the Straight and Circle Cutting Attachment (sold separately):
Attach your Professional Nibbler to the Bench Clamps as shown on page 8, then attach the Straigh and Circle Cutting Attachment to the Die of the Nibbler.
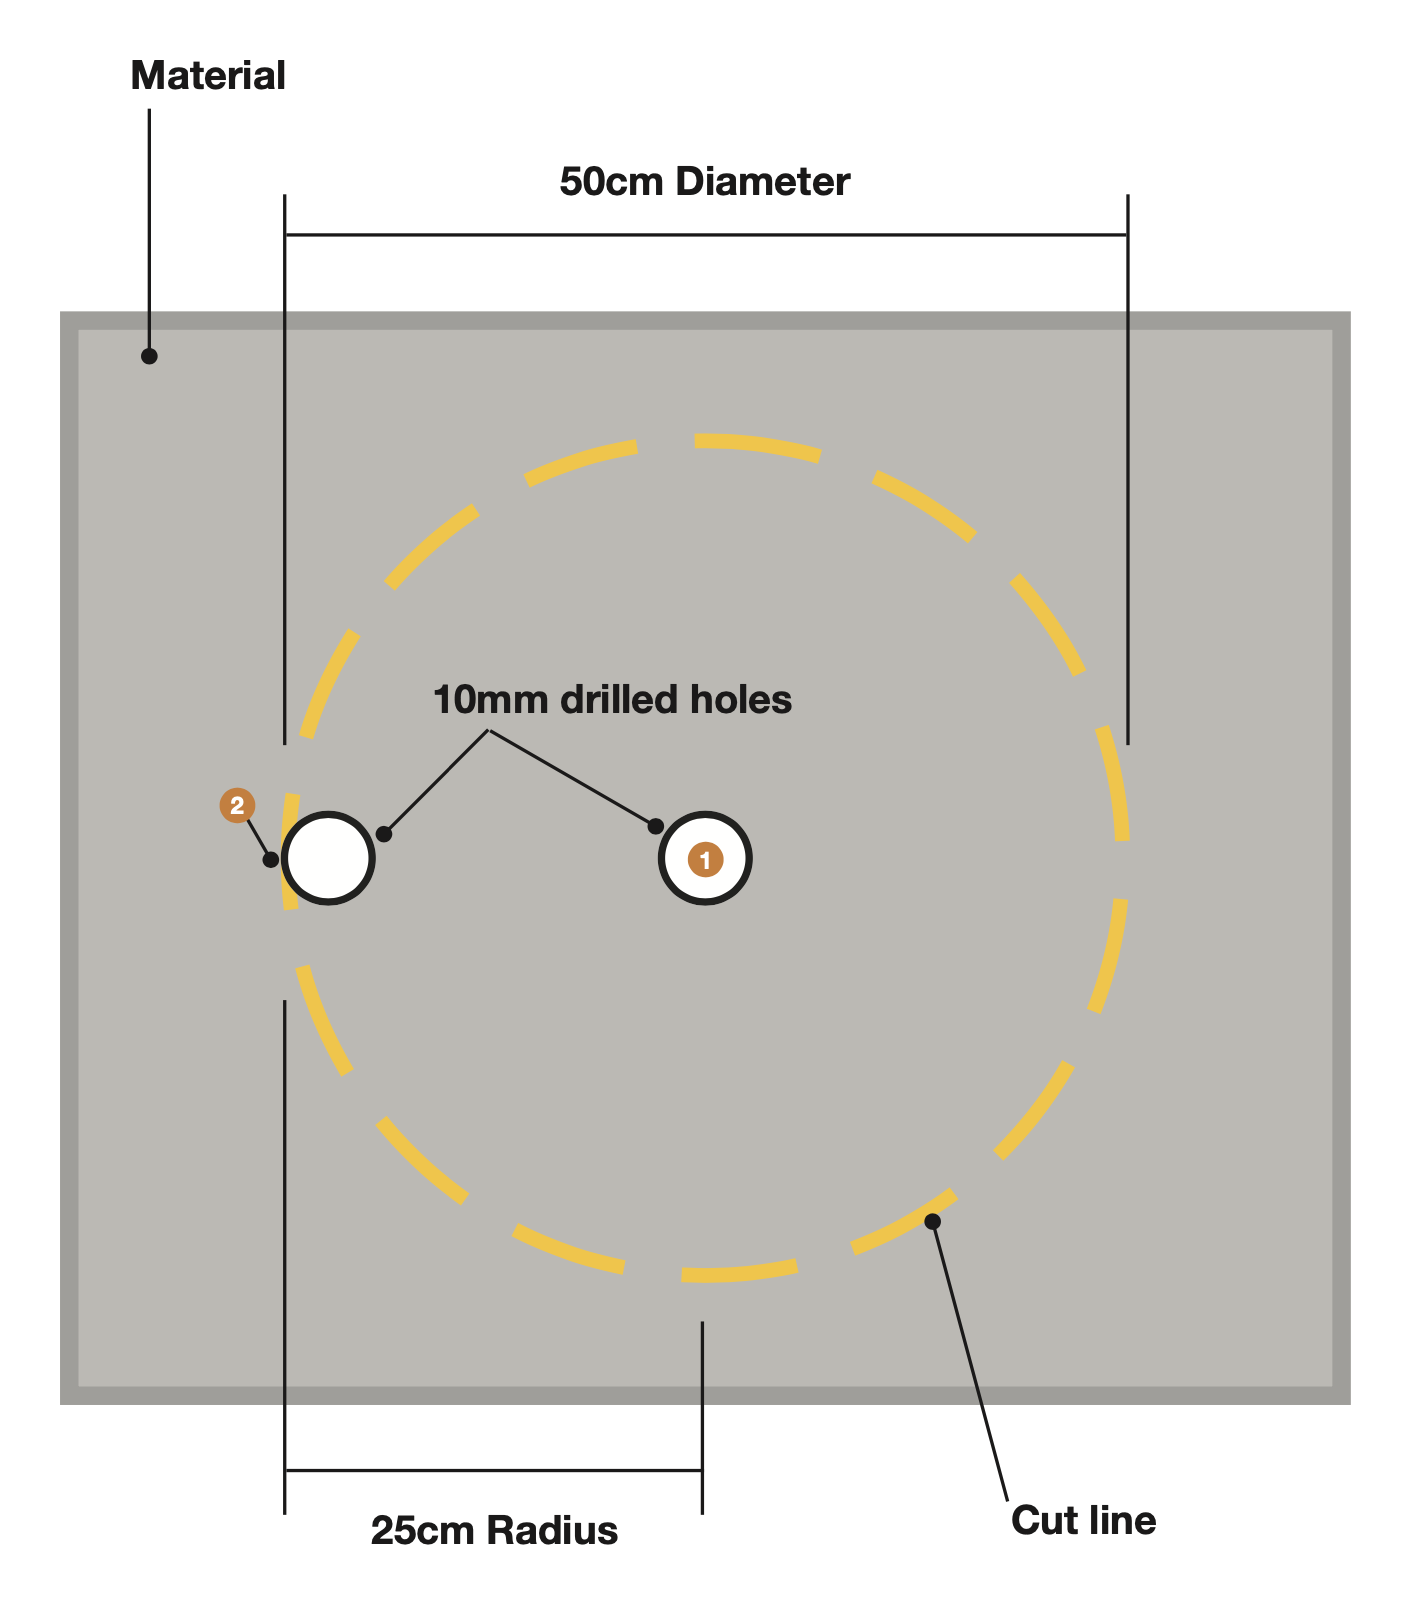
Measure and prepare your material by first marking the centre point (1) of the intended circle then measure and mark (2) the desired radius. E.G. for a 50cm circle, measure a 25cm radius as shown on page 13.
Drill a 10mm hole at the centre point (1).
At your outer mark (2) measure 5mm back towards the centre and drill a second 10mm hole. Note the outside of this hole should be flush with the outside of the indended circle.
Position the sheet of metal over the bench mounted tool, placing the Die of the Nibbler in the outer hole, and the Guide of the Circle Cutting Attachment in the centre hole. Make sure the Die and Guide are firmly apart in the holes and tighten the grub screw of the Guide on the shaft of the attachment.
Now you are ready to cut. Start up the tool and carefully rotate the sheet metal on the centre guide until the circle is completely cut out. Remember to apply a smear of oil or lubricant to the cut line.
Please note: This attachment CANNOT be used for cutting corrugated metal.
The Punch and/or Die should be renewed when the cutting edges start to show signs of wear.
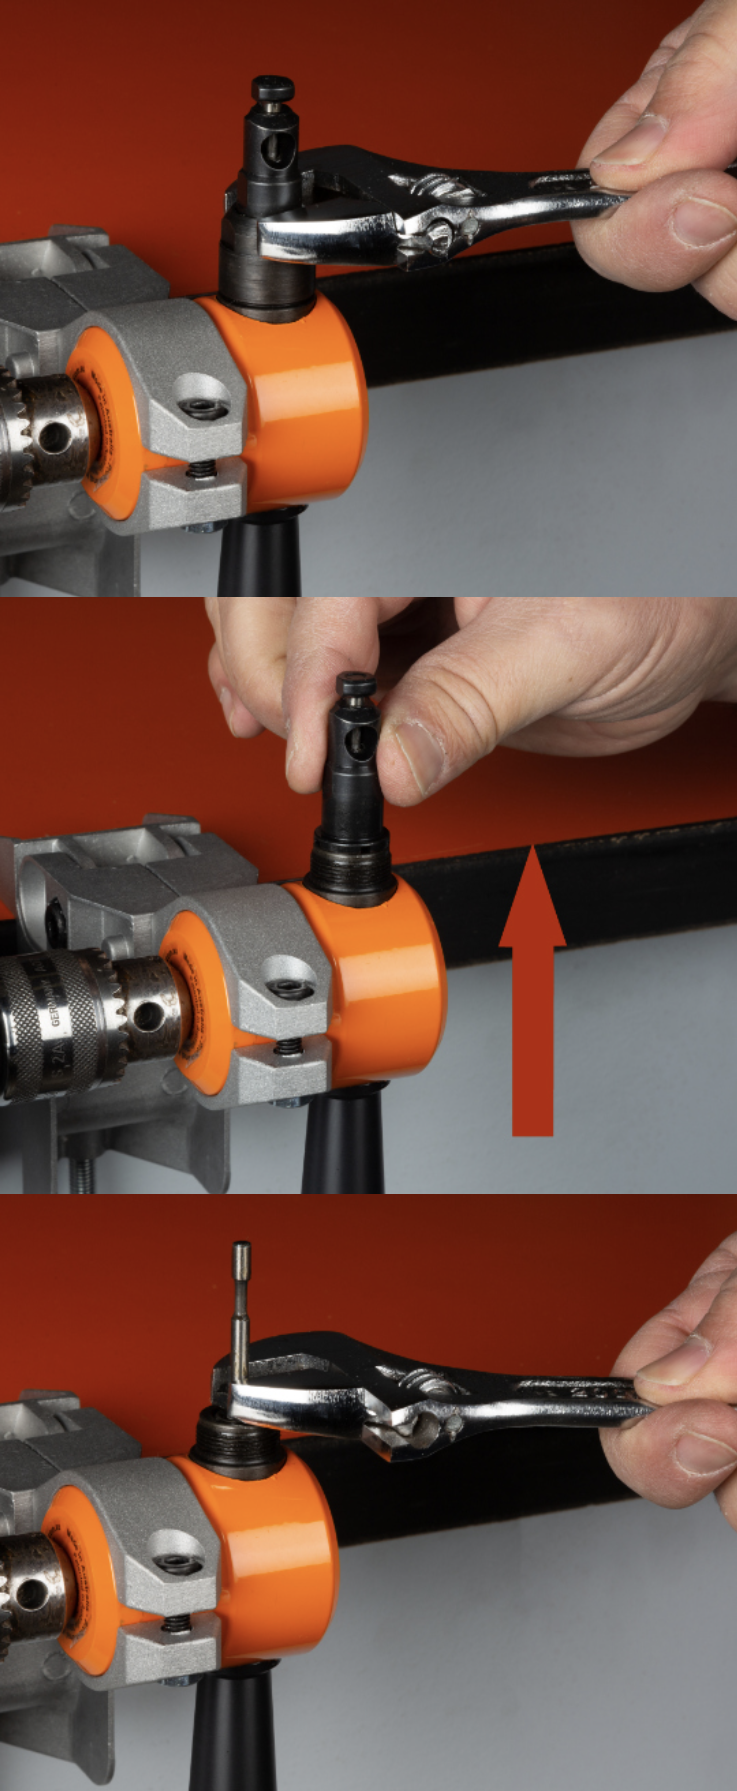
Loosen the Die Cap anti clockwise with an adjustable spanner.
Note the Die only needs to be replaced once in every three Punch (cutter) replacements.
Lift and remove the Die from the Professional Nibbler.
Loosen, unscrew, and remove the Punch Locking Nut from the Shaft with the Punch inside.
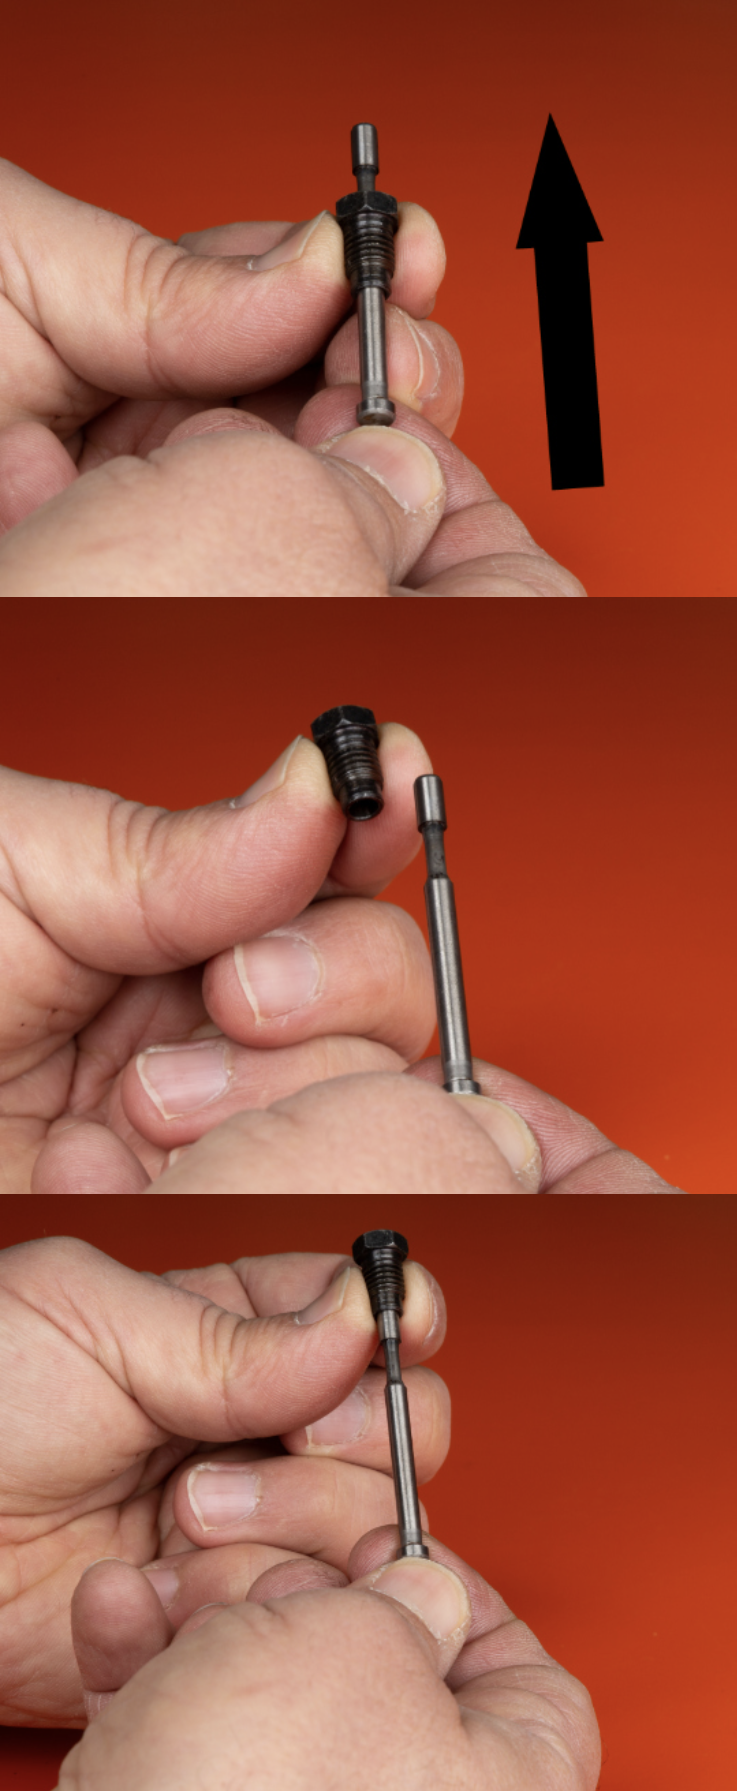
Slide the Punch (Cutter) out of the Punch Locking Nut.
Begin to reassemble by inserting the new punch (cutter) into the Punch Locking Nut.
Slide the punch locking nut down to the bottom of new Punch (cutter).
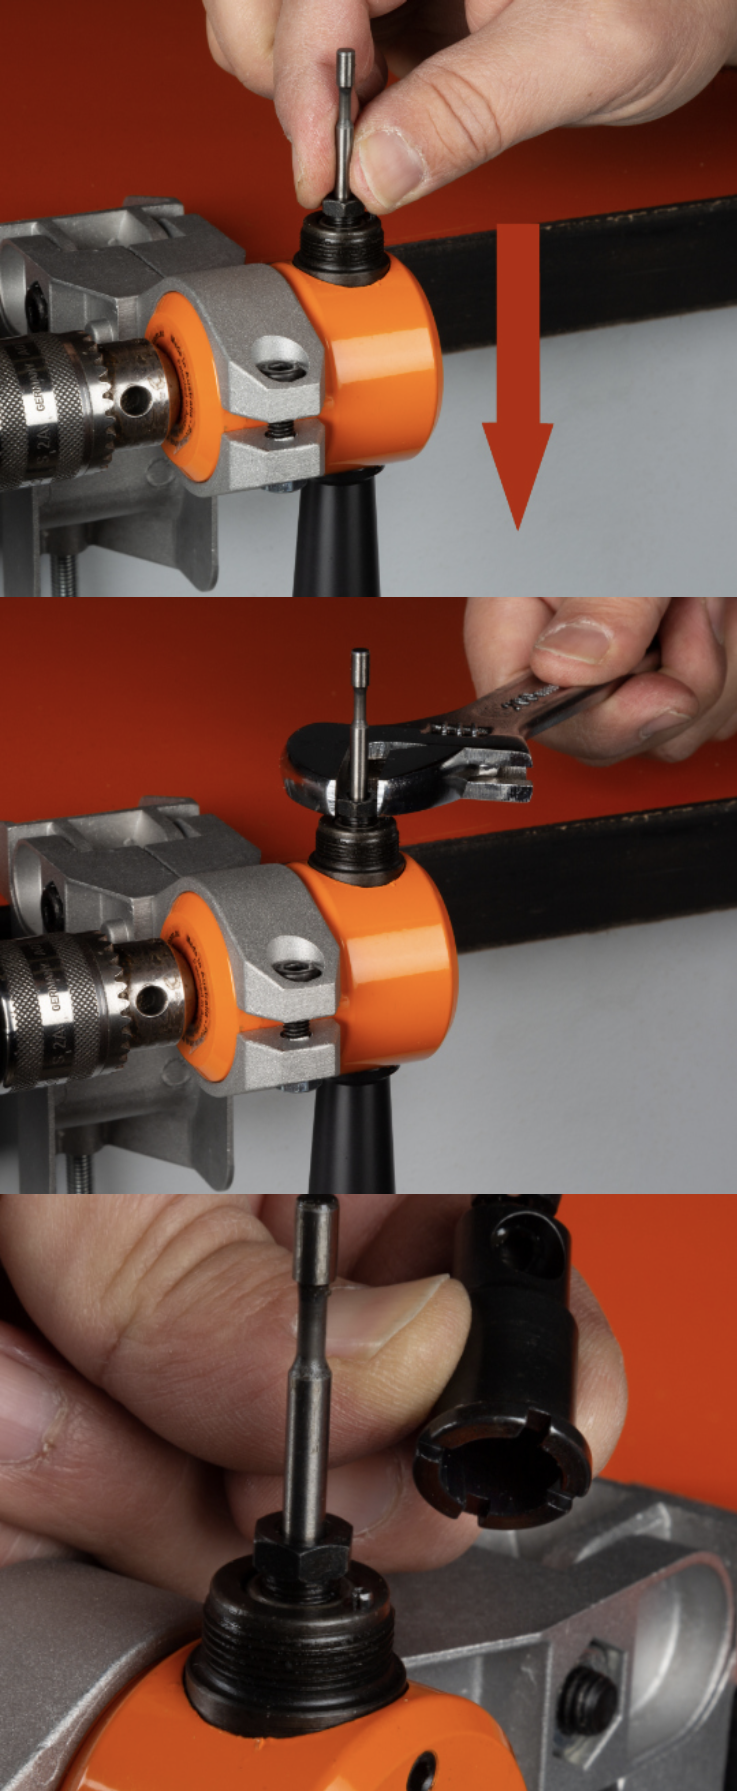
Insert the punch locking nut back into the shaft and begin to tighten with fingers first.
Tighten the Punch Locking Nut with adjustable spanner but do not overtighten.
You will notice four slots in the bottom of the Die and a split pin the Boss.
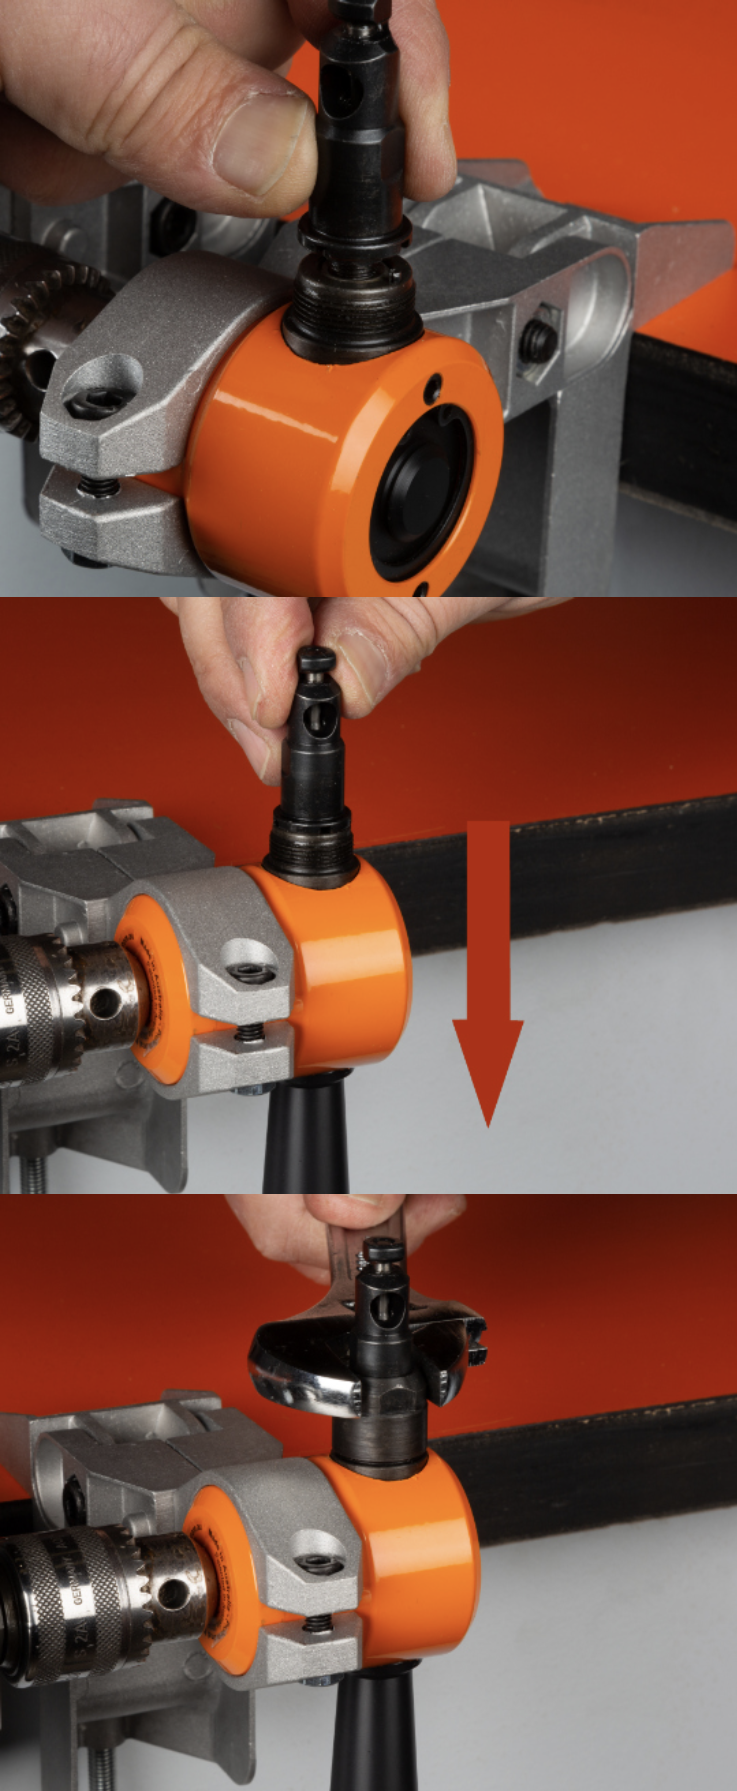
When placing into position make sure slot fits over the split pin and sits flat on the Die Boss.
Place the Die back into position over the Punch.
Slide Die Cap down onto the Die and then tighten.
Do not overtighten.
Your tool is now ready to use.
When it comes time to replace the Punch and/or Die, we suggest that one Die is replaced for every three Punch replacements.
When cutting through Stainless Steel and older corrugated iron the Punch and Die will wear faster.
If the half-moon shapes cut from the material are sticking together, this means the Die is showing signs of wear. Some plastic materials will always have their half moon shapes sticking together. Test the Professional Nibbler first on a piece of metal for a better indication of whether the Die is wearing.
The Professional Nibbler can be used with standard electric drills, cordless drills and pneumatic drills. The drill should be rated between 300 – 500 Watts with a speed of 1500 – 3000 RPM to run the Professional Nibbler properly and allow cutting of the listed materials and thicknesses.
Yes, it will run a little slower, but it will cut. This is ideal for small jobs (especially up on the roof, saves pulling a lead up)
Each cutter will cut 300 metres on corrugated and car panel steel. (Always spray CRC/WD40 along cutting path).
The cutting blades can be changed by removing the Die with a standard adjustable spanner, and takes only a few minutes. Ensure the Die is tightened firmly once you are done.
The Professional Nibbler by Newstyle Direct P/L is guaranteed for 10 years from date of purchase. This does not include wear and tear on consumable parts. (Proof of purchase required).
The Professional Nibbler can be used to cut plastic, brass, aluminium, car panel steel and corrugated iron. The tool will enable you to build sheds, perform home renovations, mini orb, and trim decks. Perfect for professionals, DIY work around the home, workshop or farm, or crafts. You can now save time and effort cutting sheet metal.
The body of the Professional Nibbler by Newstyle Direct Pty Ltd has 10-year guarantee to the purchaser from the date of purchase. If used commercially, the body of the Professional Nibbler is guaranteed for 5 years from the date of purchase. This guarantee does not include wear and tear on consumable parts. Proof of purchase is required.
Newstyle Direct Pty Ltd warrants each new Professional Nibbler, to the original purchaser thereof, to be used and maintained properly. The warranty of the body will be in effect for the life of the Professional Nibbler from the date of purchase or if used commercially, for 5 years from the date of purchase. This shall be in lieu of any other warranty, expressed or implied, including, but not limited to, any implied warranty of merchantability or fitness for a particular purpose.
Newstyle Direct Pty Ltd shall repair or replace, at its option and without cost to the original purchaser, any Professional Nibbler that has been found to be defective and is within the period of the warranty. All freight to and from the Newstyle Direct warehouse is to be paid by the customer.
The liability of Newstyle Direct under this warranty shall be limited solely to repair or replacement of the Professional Nibbler body within warranty period; and Newstyle Direct shall not be liable, under any circumstances, for consequential or incidental damaged, including, but rights and you many also have other rights vary from state to state.
Under no circumstances will Newstyle Direct Pty Ltd be responsible for any expense in connection with any repairs made by anyone other then the factory or authorised service station unless repairs have been specifically authorised in writing by Newstyle Direct Pty Ltd.
Phone: 03 9489 1177 (Mon-Fri 9am – 5pm AET)
Address: Newstyle Direct Pty Ltd,
18 Montefiore Street, Fairfield, VIC 3078, Australia
Register your warranty today by filling out the form below and mailing it to us at the above address or by visiting professionalnibbler.com.au/warranty-registration.

The Professional Nibbler fits quickly and easily to any electric or battery drill, this means it’s portable and can be used either in a shed or outside in a paddock. It has multiple applications so now you are ready to tackle any project. Build that shed, repair gutters, install water tank and all those D.I.Y jobs that need doing.
Subscribe now to receive our newsletter and exclusive offers.

Looks like you haven't made a choice yet.